Lambdaをサクサク作りたい
最近実務でもプライベートでもLambdaを使う機会が多いのですが、毎回悩むのが開発環境とCI/CD。
ちょっとしたLambdaならブラウザコンソール上のエディタを使って作るとか、zipで固めるとかでいいんですけど、それなりに大きなLambda関数だとやっぱり
ローカルで開発&単体テスト&結合テスト --> GitにPush --> 自動テスト&デプロイ(ついでにcoverage計測)
てな流れを作りたい。
構成
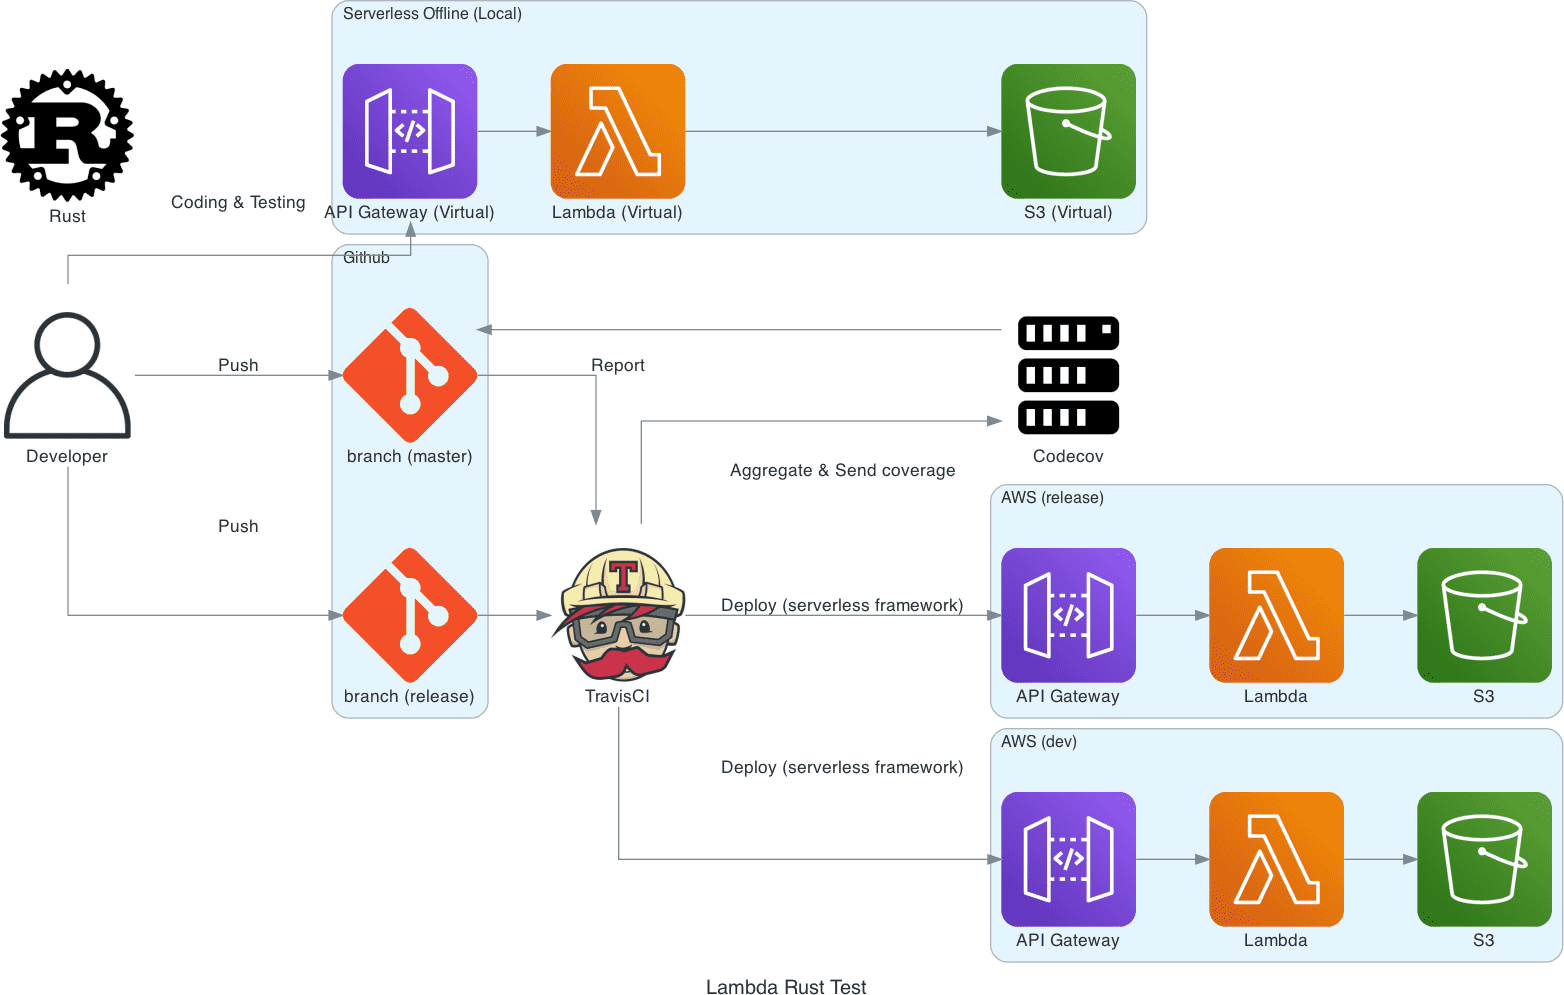
ということで、今回は下記のような構成で作ってみたいと思います。

- ローカルでコーディング、テスト、動作確認
- GitにPush(masterブランチはdev環境、releaseブランチはrelease環境)
- 自動テスト、デプロイ、codecovにカバレッジ送信
- プルリクの場合、codecovからプルリクにカバレッジレポート自動POST
開発者がやることはローカルでコーディングしてテスト書いてGitにPushするだけ。あとは自動でテスト、カバレッジ計測、問題無ければデプロイまで実施してくれるようにしたいです。
今回作るAPIは下記の通りです。S3との通信ができれば他サービスとの連携も可能なので、これくらいシンプルで良いと思います。
Request(application/json): { "textBody": "ファイルに書き込みたい内容" }
Response(ok):{ "messasge": "Succeeded." }
Response(4xx/5xx):{ エラー内容 }
Description:
textBodyに指定した内容をS3バケットのtext.txtに保存するAPI。
使用する技術・サービス
今回使用する技術・サービスのうち、主要なものを記載しておきます。
| 技術・サービス名 | 概要 |
|---|---|
| Serverless Framework | AWSの各種サービスへのデプロイを自動化するためのフレームワーク。 serverless.yml に構成を記述することで、一発でデプロイできます。 |
| serverless-offline | ローカルでserverlessでデプロイする環境のうち、LambdaとAPI Gatewayを再現するプラグイン。 |
| serverless-s3-local | ローカルでserverlessでデプロイする環境のうち、S3を再現するプラグイン。serverless-offlineのプラグインという位置付けです。 |
| serverless-rust | serverless-offlineでRustで書いたLambdaを動作させるためのプラグイン。 |
| TravisCI | CIサービス。公開リポジトリなら無料で使えます。 |
| Codecov | カバレッジレポートサービス。公開リポジトリなら無料で使えます。 |
TravisCIとCodecovの登録方法については割愛するので、未登録の方は登録しておいてください(Githubでログインするだけ)。
ローカル開発環境とメイン処理
それでは始めにローカル開発環境の構築を行っていきます。S3との通信はとりあえず置いといて、APIにPOSTしたらバリデーションして返答を返すところまで。
プロジェクト作成
今回はserverless AWS Rust HTTP templateをベースにプロジェクトを作成します。
$ npx sls install \
  --url https://github.com/softprops/serverless-aws-rust-http \
  --name lambda-rust-sample
$ cd lambda-rust-sample必要なnode modulesの追加
$ npm i serverless -g
$ npm i -D serverless-offline serverless-s3-local serverless-rustなお、serverlessコマンドはglobal領域にインストールしておきます。
また、serverless-offlineのmasterブランチは本記事執筆時点(2020/11/15)でrustに対応しておらず、こちらのプルリクエストで対応されているので、そっちを使うようにします。
"serverless-offline": "EgorDm/serverless-offline.git#feature/rust-invoke",serverless.ymlの修正
serverless.yml を修正して、下記の通り修正します。
service: rust-lambda-sample
provider:
  name: aws
  runtime: rust
  memorySize: 128
  region: ap-northeast-1
  stage: ${opt:stage, self:custom.defaultStage}
  logs:
    restApi:
      accessLogging: true
package:
  individually: true
plugins:
  - serverless-rust
  - serverless-offline
  - serverless-s3-local
functions:
  hello:
    handler: hello
    events:
      - http:
          path: '/'
          method: POST
          integration: lambda
          request:
            template:
              application/json: $input.json('$')
custom:
  s3:
    host: localhost
    directory: /tmp
    port: 8000
vhostBuckets: false少しポイントになる所を解説。
...
provider:
  name: aws
  runtime: rust
plugins:
  - serverless-rust
  - serverless-offline
  - serverless-s3-local
...ここで、プラグインとして先程追加したserverless-rust、offline、s3-localを使用することを示しています。また、serverless-rustのおかげでruntimeとしてrustを指定できます。
...
functions:
  hello:
    handler: hello
    events:
      - http:
          path: '/'
          method: POST
          integration: lambda
          request:
            template:
              application/json: $input.json('$')
...integration に lambda を指定しています。何も指定しないと lambda-proxy となりますが、プロキシ統合だと勝手にAPI Gatewayでリクエストとレスポンスのマッピングな行われてしまい上手くいかなかったのでLambda統合にしました。
リクエストマッピングについては template にて設定しており、リクエストの body だけ取り出してAPI GatewayからLambdaにパスする流れになっています。
Cargo.tomlの修正
ひとまず必要な依存関係だけ定義しておきます。 anyhow や simple_logger はそれぞれエラーハンドリングとログパッケージですが、お好きなパッケージがありましたらそちらを使用してもOKです。
なお、 lambda と lambda_http についてはcrates.ioに上がっているパッケージではなく、githubの最新ソースから取得するようにします。
[package]
name = "hello"
version = "0.1.0"
edition = "2018"

[dependencies]
tokio = { version = "0.2", features = ["macros"] }
lambda = { git = "https://github.com/awslabs/aws-lambda-rust-runtime/", branch = "master"}
lambda_http = { git = "https://github.com/awslabs/aws-lambda-rust-runtime/", branch = "master"}
serde_derive = "1.0.117"
serde = "1.0.117"
serde_json = "1.0.59"
simple_logger = "1.11.0"
log = "0.4.11"
anyhow = "1.0.34"Lambda本体の作成
LambdaのソースコードをRustで記述します。
use lambda::{handler_fn, Context};
use anyhow::{anyhow, Result};
use serde_derive::{Deserialize, Serialize};
use simple_logger::SimpleLogger;
use log::{LevelFilter, error};

#[derive(Deserialize, Debug)]
#[serde(rename_all = "camelCase")]
struct CustomEvent {
    text_body: Option<String>,
}

#[derive(Serialize, Debug, PartialEq)]
struct CustomOutput {
    message: String,
}

const MSG_EMPTY_TEXT_BODY: &str = "Empty text body.";
const MSG_TEXT_BODY_TOO_LONG: &str = "Text body is too long (max: 100)";

#[tokio::main]
async fn main() -> Result<()> {
    SimpleLogger::new().with_level(LevelFilter::Debug).init().unwrap();
    lambda::run(handler_fn(hello))
        .await
        // https://github.com/dtolnay/anyhow/issues/35
        .map_err(|err| anyhow!(err))?;
    Ok(())
}

async fn hello(event: CustomEvent, c: Context) -> Result<CustomOutput> {
    if let None = event.text_body {
        error!("Empty text body in request {}", c.request_id);
        return Err(anyhow!(get_err_msg(400, MSG_EMPTY_TEXT_BODY)));
    }
    let text = event.text_body.unwrap();
    if text.len() > 100 {
        error!("text body is too long (max: 100) in request {}", c.request_id);
        return Err(anyhow!(get_err_msg(400, MSG_TEXT_BODY_TOO_LONG)));
    }

    Ok(CustomOutput {
        message: format!("Succeeded.")
    })
}

fn get_err_msg(code: u16, msg: &str) -> String {
    format!("[{}] {}", code, msg)
}

#[cfg(test)]
mod tests {
    use super::*;

    #[tokio::test]
    async fn can_hello_handler_handle_valid_request() {
        let event = CustomEvent {
            text_body: Some("Firstname".to_string())
        };
        let expected = CustomOutput {
            message: "Succeeded.".to_string()
        };
        assert_eq!(
            hello(event, Context::default())
                .await
                .expect("expected Ok(_) value"),
            expected
        )
    }

    #[tokio::test]
    async fn can_hello_handler_handle_empty_text_body() {
        let event = CustomEvent {
            text_body: None
        };
        let result = hello(event, Context::default()).await;
        assert!(result.is_err());
        if let Err(error) = result {
            assert_eq!(
                error.to_string(),
                format!("[400] {}", MSG_EMPTY_TEXT_BODY)
            )
        } else {
            // result must be Err
            panic!()
        }
    }

    #[tokio::test]
    async fn can_hello_handler_handle_text_body_too_long() {
        let event = CustomEvent {
            text_body: Some("12345678901234567890123456789012345678901234567890123456789012345678901234567890123456789012345678901".to_owned())
        };
        let result = hello(event, Context::default()).await;
        assert!(result.is_err());
        if let Err(error) = result {
            assert_eq!(
                error.to_string(),
                format!("[400] {}", MSG_TEXT_BODY_TOO_LONG)
            )
        } else {
            // result must be Err
            panic!()
        }
    }
}CustomEvent がAPI Gatewayから受け取った内容(=ユーザのリクエストbody)に対応しており、 text_body を Option にすることで何も指定しない場合に500で死なないようにしています。
CustomOutput はレスポンスの内容になります。
ややこしいことは lambda-rust-runtime がやってくれるので、こちらが書く内容としてはリクエストとレスポンスをマッピングする構造体を定義して、それを返却するだけです。現状のソースでは、リクエストに textBody が存在すれば Succeeded. が、存在しなかったり100文字以上だとエラーメッセージが返ってきます。
動作確認
それでは、ローカルで動作確認してみます。
プロジェクトルートで下記のコマンドを実行し、ローカル環境を走らせます。
$ npm i
$ sls offline start --stage local
...
POST | http://localhost:3000/localこの状態で、POSTを飛ばしてみます。POSTした時点でRustのビルドがスタートするので、初回は結構時間がかかります。
$ curl -X POST -H "Content-Type: application/json" -d '{"textBody": "aaaaa"}' http://localhost:3000/local
{"body":"{\"message\":\"Succeeded.\"}"}
$ curl -X POST -H "Content-Type: application/json" -d '{"textBodyyyyy": "aaaaa"}' http://localhost:3000/local
{"body":"{\"errorType\":\"anyhow::Error\",\"errorMessage\":\"[400] Empty text body.\"}"}ローカルだとresponseがbodyに入っちゃってますが、実際にデプロイすると中身だけちゃんと返ってきます(ほんとは同じ挙動になってほしいけど多分serverless-offlineの仕様orバグ?)。
デプロイ確認
ここまでのソースで、手動でデプロイできるか確認しておきます。
serverlessのcredential設定を行います。
$ sls config credentials --stage dev --provider aws --key "${AWS_ACCESS_KEY_ID}" --secret "${AWS_SECRET_ACCESS_KEY}"
$ sls deploy --stage dev
デプロイ後、表示されたエンドポイントにPOSTしてみて、想定通りのレスポンスが返却されることを確認します。
S3通信処理の追加とカバレッジ収集
S3との通信処理実装
S3との通信に使用するcrateはrusotoです。
まず、依存関係を追加します。
rusoto_core = "0.45.0"
rusoto_s3 = "0.45.0"
rusoto_mock = "0.45.0"今回使用するバケットの情報を serverless.yml に追加しておきます。
service: rust-lambda-test
provider:
...
  iamRoleStatements:
    - Effect: "Allow"
      Action:
        - "s3:*"
      Resource:
        Fn::Join:
          - ""
          - - "arn:aws:s3:::"
            - ${self:custom.bucketName.${self:provider.stage}}
            - "/*"
...
functions:
  hello:
...
    environment:
      BUCKET_NAME: ${self:custom.bucketName.${self:provider.stage}}
      LOCAL_FLAG: ${self:custom.localFlag.${self:provider.stage}}
resources:
  Resources:
    Bucket:
      Type: AWS::S3::Bucket
      Properties:
        BucketName: ${self:custom.bucketName.${self:provider.stage}}
custom:
...
  bucketName:
    local: zeroclock-lambda-rust-bucket-local
    dev: zeroclock-lambda-rust-bucket-dev
    release: zeroclock-lambda-rust-bucket-release
  localFlag:
    local: local
    dev: ''
release: ''S3Clientを取得する処理と、単体テストを追加します。すいません、ちょっと長いです・・・。
use std::env;
use rusoto_s3::{
    S3,
    S3Client,
    PutObjectRequest,
};
use rusoto_core::Region;
use rusoto_mock::{
    MockCredentialsProvider,
    MockRequestDispatcher,
    MockResponseReader,
    ReadMockResponse,
};

...
const MOCK_KEY: &str = "AWS_MOCK_FLAG";
const BUCKET_NAME_KEY: &str = "BUCKET_NAME";
const LOCAL_KEY: &str = "LOCAL_FLAG";

...
async fn hello(event: CustomEvent, c: Context) -> Result<CustomOutput> {
...
    let s3 = get_s3_client();
    let bucket_name = env::var(BUCKET_NAME_KEY)?;
    s3.put_object(PutObjectRequest {
        bucket: bucket_name.to_string(),
        key: "test.txt".to_string(),
        body: Some(text.into_bytes().into()),
        acl: Some("public-read".to_string()),
        ..Default::default()
    }).await?;

    Ok(CustomOutput {
        message: format!("Succeeded.")
    })
}

...
fn get_s3_client() -> S3Client {
    let s3 = match env::var(MOCK_KEY) {
        Ok(_) => {
            // Unit Test
            S3Client::new_with(
                MockRequestDispatcher::default().with_body(
                    &MockResponseReader::read_response("mock_data", "s3_test.json")
                ),
                MockCredentialsProvider,
                Default::default(),
            )
        },
        Err(_) => {
            if env::var(LOCAL_KEY).unwrap() != "" {
                // local
                return S3Client::new(Region::Custom {
                    name: "ap-northeast-1".to_owned(),
                    endpoint: "http://host.docker.internal:8000".to_owned(),
                })
            }
            // cloud
            return S3Client::new(Region::ApNortheast1)
        },
    };
    s3
}

#[cfg(test)]
mod tests {
    use super::*;

    fn setup() {
        env::set_var(MOCK_KEY, "1");
        env::set_var(BUCKET_NAME_KEY, "test-bucket");
    }

    #[test]
    fn can_get_local_s3_client() {
        env::set_var(LOCAL_KEY, "local");
        let _s3 = get_s3_client();
        assert!(true);
    }

    #[test]
    fn can_get_cloud_s3_client() {
        env::set_var(LOCAL_KEY, "");
        let _s3 = get_s3_client();
        assert!(true);
    }

    #[tokio::test]
    async fn can_hello_handler_handle_valid_request() {
        setup();
        let event = CustomEvent {
            text_body: Some("Firstname".to_string())
        };
        let expected = CustomOutput {
            message: "Succeeded.".to_string()
        };
        assert_eq!(
            hello(event, Context::default())
                .await
                .expect("expected Ok(_) value"),
            expected
        )
    }

    #[tokio::test]
    async fn can_hello_handler_handle_empty_text_body() {
        setup();
        let event = CustomEvent {
            text_body: None
        };
        let result = hello(event, Context::default()).await;
        assert!(result.is_err());
        if let Err(error) = result {
            assert_eq!(
                error.to_string(),
                format!("[400] {}", MSG_EMPTY_TEXT_BODY)
            )
        } else {
            // result must be Err
            panic!()
        }
    }

    #[tokio::test]
    async fn can_hello_handler_handle_text_body_too_long() {
        setup();
        let event = CustomEvent {
            text_body: Some("12345678901234567890123456789012345678901234567890123456789012345678901234567890123456789012345678901".to_owned())
        };
        let result = hello(event, Context::default()).await;
        assert!(result.is_err());
        if let Err(error) = result {
            assert_eq!(
                error.to_string(),
                format!("[400] {}", MSG_TEXT_BODY_TOO_LONG)
            )
        } else {
            // result must be Err
            panic!()
        }
    }
}単体テスト時はrusoto_mockを使用し、ローカル開発環境の場合はカスタムエンドポイントで生成しています。 host.docker.internal は、Dockerコンテナから見たホストマシンのIPアドレスです(serverless-offlineのrustプラグインの場合、内部的にdockerが起動しているため)。
なお、credentialsは環境変数を使用するのでコード内には出てきません。
rusoto_mockでS3Clientを生成する際、レスポンスのデータを記述したファイルが必要なので、今回は空データを準備しておき、テストを実行してみます。
$ mkdir mock_data
$ touch mock_data/s3_test.json
$ cargo test
    Finished test [unoptimized + debuginfo] target(s) in 5.07s
     Running target/debug/deps/hello-ed9968ea3f56ae48

running 5 tests
test tests::can_get_cloud_s3_client ... ok
test tests::can_get_local_s3_client ... ok
test tests::can_hello_handler_handle_text_body_too_long ... ok
test tests::can_hello_handler_handle_empty_text_body ... ok
test tests::can_hello_handler_handle_valid_request ... ok

test result: ok. 5 passed; 0 failed; 0 ignored; 0 measured; 0 filtered outカバレッジ収集
カバレッジ収集は下記のCLIツールを使用します。
| 名称 | 概要 |
|---|---|
| lcov | カバレッジデータ自体は後述のgrcovで良いのですが、ローカルでカバレッジをHTMLに出力するために使用(genhtmlコマンド)。Macの場合は brew install lcov でOK。 |
| grcov | Rustのカバレッジ収集ツール。Mozillaが保守しているので安心。Cargoでインストール( cargo install grcov )。 |
| rust-covfix | 必須じゃないですけど、これが無いとなんかカバレッジが明らかに高かったり低かったり謎の現象に見舞われたので使用。Cargoでインストール( cargo install rust-covfix )。 |
若干面倒なので、スクリプトを書いてプロジェクトルートに置いておきます(codecovのところは今はスルーでOK)。
#!/usr/bin/env bash

set -eux

PROJ_NAME=$(cat Cargo.toml | grep -E "^name" | sed -E 's/name[[:space:]]=[[:space:]]"(.*)"/\1/g' | sed -E 's/-/_/g')
rm -rf target/debug/deps/${PROJ_NAME}-*

export CARGO_INCREMENTAL=0
export RUSTFLAGS="-Zprofile -Ccodegen-units=1 -Copt-level=0 -Clink-dead-code -Coverflow-checks=off -Zpanic_abort_tests -C panic=abort"

cargo +nightly build
cargo +nightly test

zip -0 ccov.zip `find . \( -name "${PROJ_NAME}*.gc*" -o -name "test-*.gc*" \) -print`
grcov ccov.zip -s . -t lcov --llvm --branch --ignore-not-existing --ignore "/*" --ignore "tests/*" -o lcov.info
rust-covfix -o lcov.info lcov.info

if [ $# = 0 ] || [ "$1" != "ontravis" ]; then
    genhtml -o report/ --show-details --highlight --ignore-errors source --legend lcov.info --branch-coverage
fi

if [ $# -gt 1 ] && [ "$2" = "sendcov" ]; then
    bash <(curl -s https://codecov.io/bash) -f lcov.info -t "${CODECOV_TOKEN}"
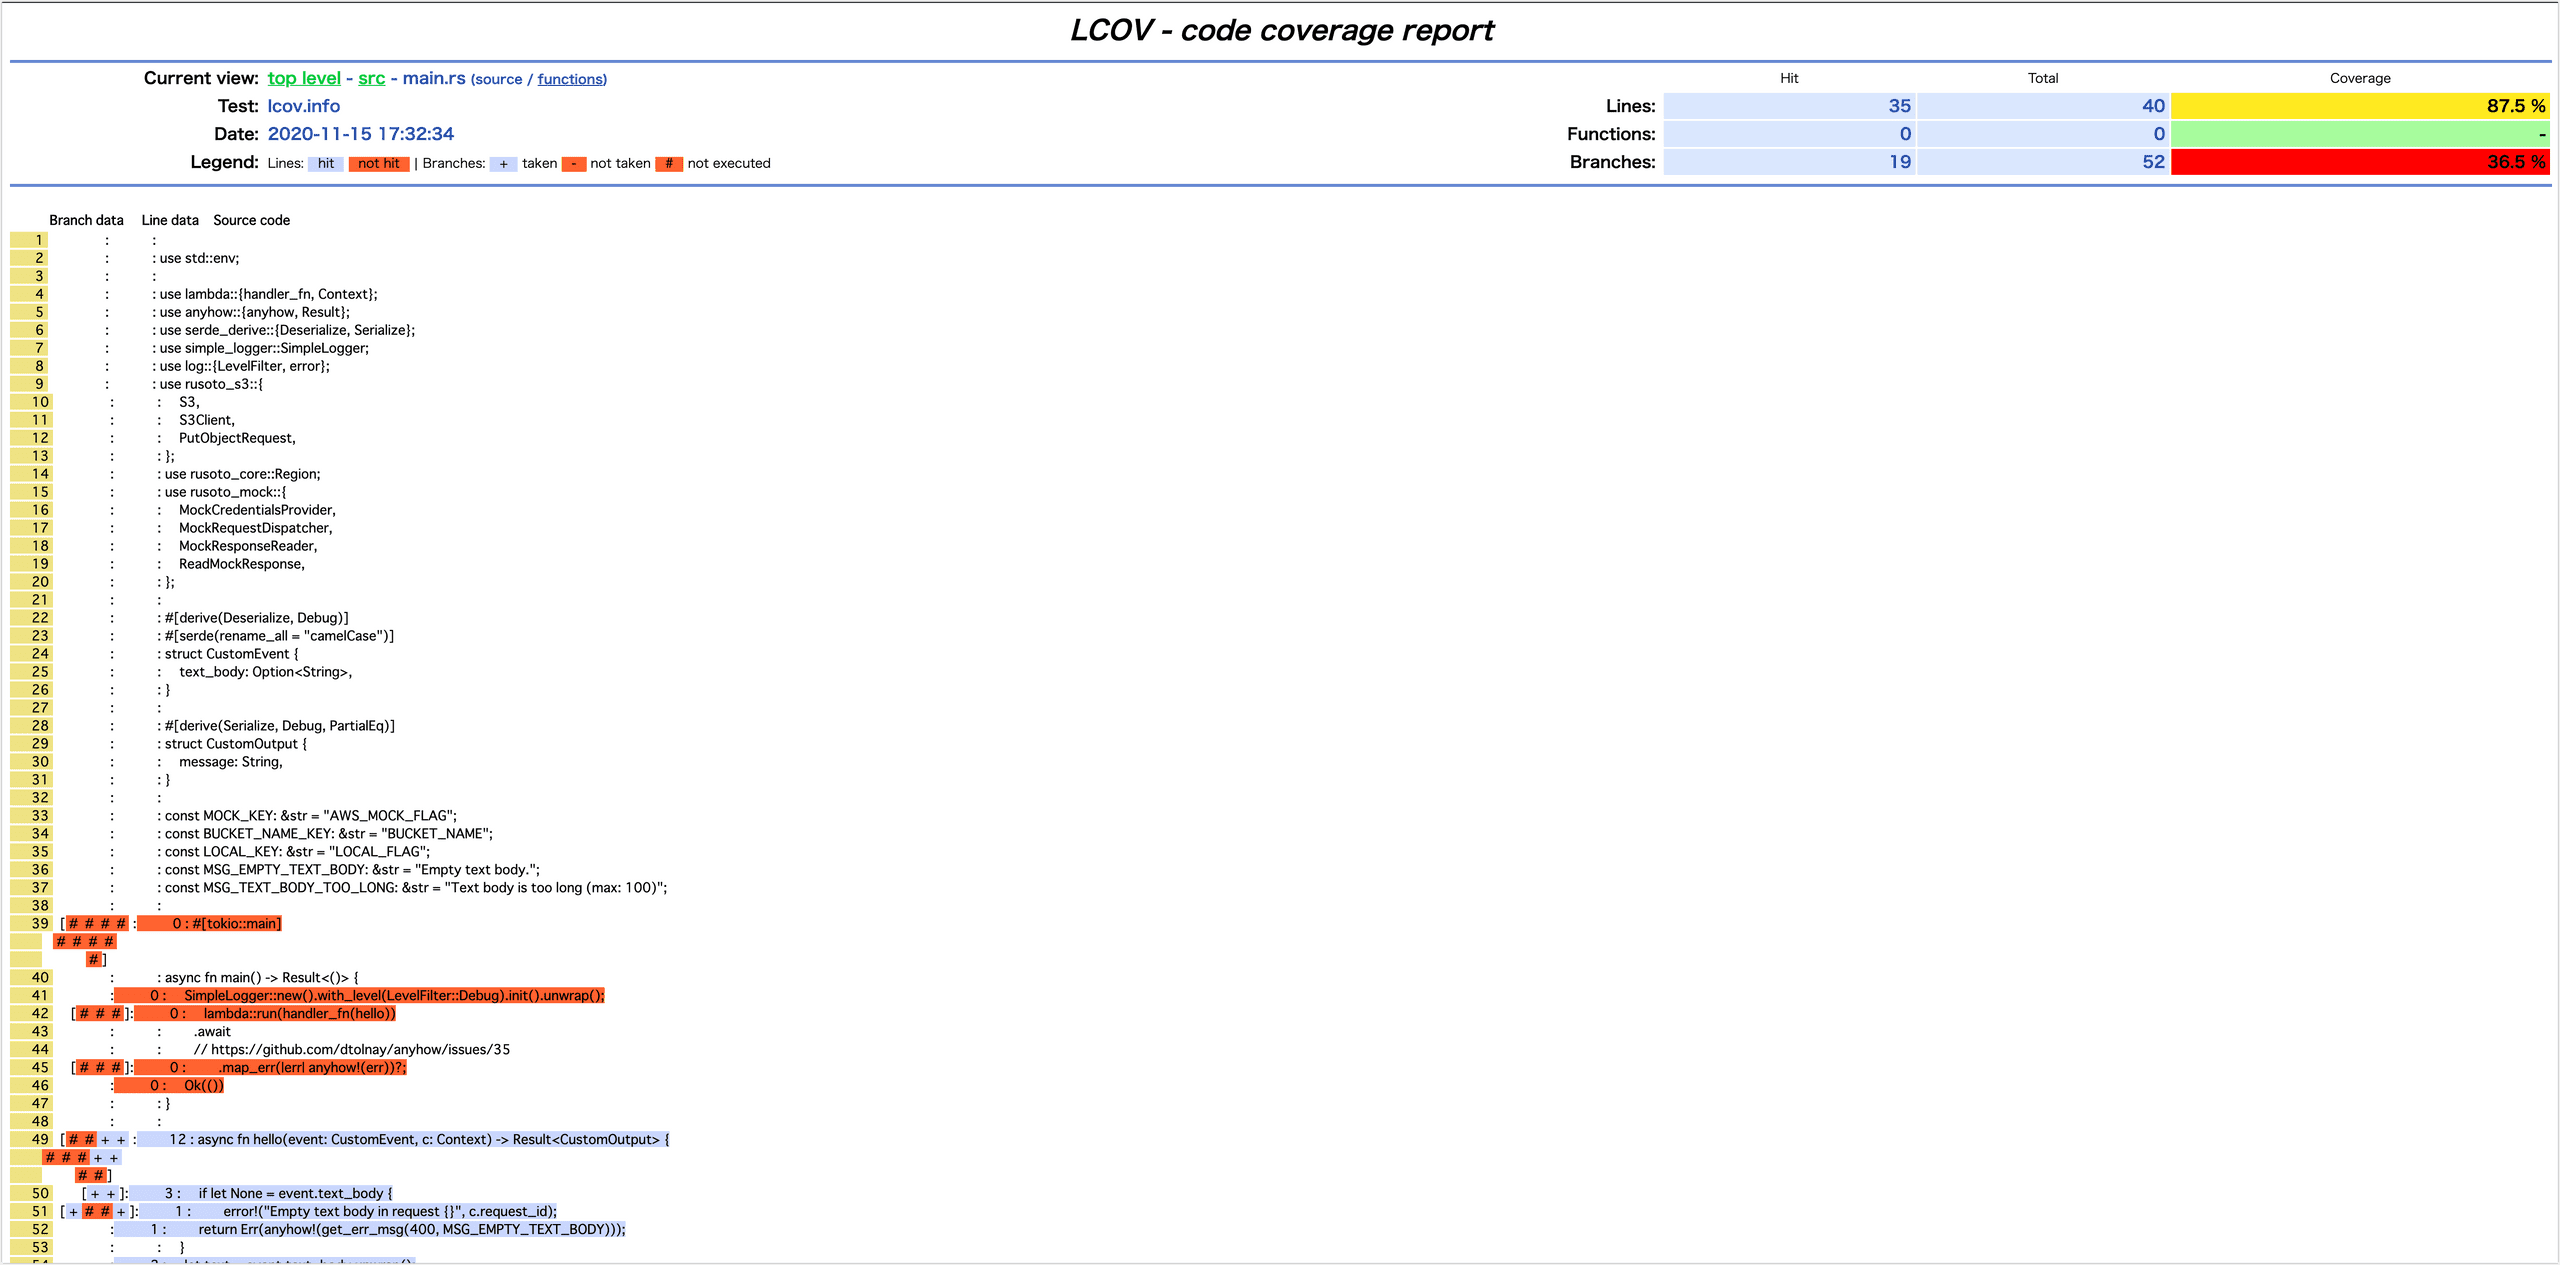
fi引数無しで、カバレッジを計測してレポートをHTML出力させます。
$ bash coverage.sh成功したら、 report/index.html をブラウザで開くとカバレッジが見れます。

これで、カバレッジ計測までいけました。
ローカルでS3との連携テスト
単体テストも通ってカバレッジも取れるようになったので、S3連携処理込みでローカル動作確認してみます。
はじめに、serverless-s3-local用にAWS CLI用のcredentials設定が必要です。
$ vim ~/.aws/credentials
#以下を追加
[s3local]
aws_access_key_id=S3RVER
aws_secret_access_key=S3RVER# タブA
# AWS_PROFILEにs3-local用のprofileを指定
$ AWS_PROFILE=s3local sls offline start --stage local
# タブB
$ curl -X POST -H "Content-Type: application/json" -d '{"textBody": "aaaaa"}' http://localhost:3000/local
{"body":"{\"message\":\"Succeeded.\"}"}成功したっぽいので、実際に保存されているか確認してみます。
$ aws --endpoint="http://localhost:8000" s3 cp s3://zeroclock-lambda-rust-sample-bucket-local/test.txt /tmp/s3_result.txt --profile s3local
$ cat /tmp/s3_result.txt
aaaaaいい感じ。
最後に、手動デプロイを再度実行して問題なく完了することを確認します。
$ sls deploy --stage devCI/CD環境構築
コーディングしてローカルで検証して手動でデプロイするところまでは問題無かったので、最後に自動デプロイ&カバレッジレポートを設定します。
それぞれ、TravisCIとCodecovを使用しますが、それぞれの連携方法及びCLIツールのインストール方法については割愛します。Githubでログインしてレポジトリを選ぶだけなので。
まず、デプロイに必要な下記の情報を安全にTravisCIに渡せるように暗号化します。
- AWS IAMユーザのアクセスキーID(aws_access_key_id)
- AWS IAMユーザのシークレットアクセスキー(aws_secret_access_key)
- Codecovのトークン(CODECOV_TOKEN)
$ travis encrypt aws_access_key_id="xxxxx..."
$ travis encrypt aws_secret_access_key="xxxxx..."
$ travis encrypt CODECOV_TOKEN="XXXXXXXX-xxxx...."TravisCI用の設定ファイル .travis.yml を作成して設定します。 secret には先程暗号化した3つの環境変数の情報が入ります。
language: rust
rust:
  - nightly
cache: cargo
install:
  - cargo install grcov rust-covfix
  - nvm install 12.14.1 --latest-npm
  - nvm alias default 12.14.1
  - npm install serverless -g
  - npm install
  - sls config credentials --stage dev --provider aws --key "${aws_access_key_id}" --secret "${aws_secret_access_key}"
before_script:
  - cargo test
script:
  - npm run coverage:ci-sendcov
  - if [ "$TRAVIS_BRANCH" = "master" ] && [ "$TRAVIS_PULL_REQUEST" = "false" ]; then echo "This is master which released to dev stage." && npm run deploy:dev; fi
  - if [ "$TRAVIS_BRANCH" = "release" ] && [ "$TRAVIS_PULL_REQUEST" = "false" ]; then echo "This is release which released to release stage." && npm run deploy:release; fi
env:
  global:
    - secure: "fugahuga..."
    - secure: "hogehoge..."
- secure: "hogehoge..."package.json にscriptを追加しておきます。
{
  "scripts": {
    "start": "AWS_PROFILE=s3local sls offline start --stage local",
    "deploy:dev": "sls deploy --stage dev",
    "deploy:release": "sls deploy --stage release",
    "coverage": "bash coverage.sh",
    "coverage:ci": "bash coverage.sh ontravis",
    "coverage:ci-sendcov": "bash coverage.sh ontravis sendcov"
  },
  ...
}最後に、Codecov用の設定ファイル codecov.yml を作成します。
codecov:
  require_ci_to_pass: yes

coverage:
  precision: 2
  round: down
  range: "70...100"

parsers:
  gcov:
    branch_detection:
      conditional: yes
      loop: yes
      method: no
      macro: no

comment: # See: https://docs.codecov.io/docs/pull-request-comments
  layout: "reach, diff, flags, files"
  behavior: default
  require_changes: no
  require_base: yes
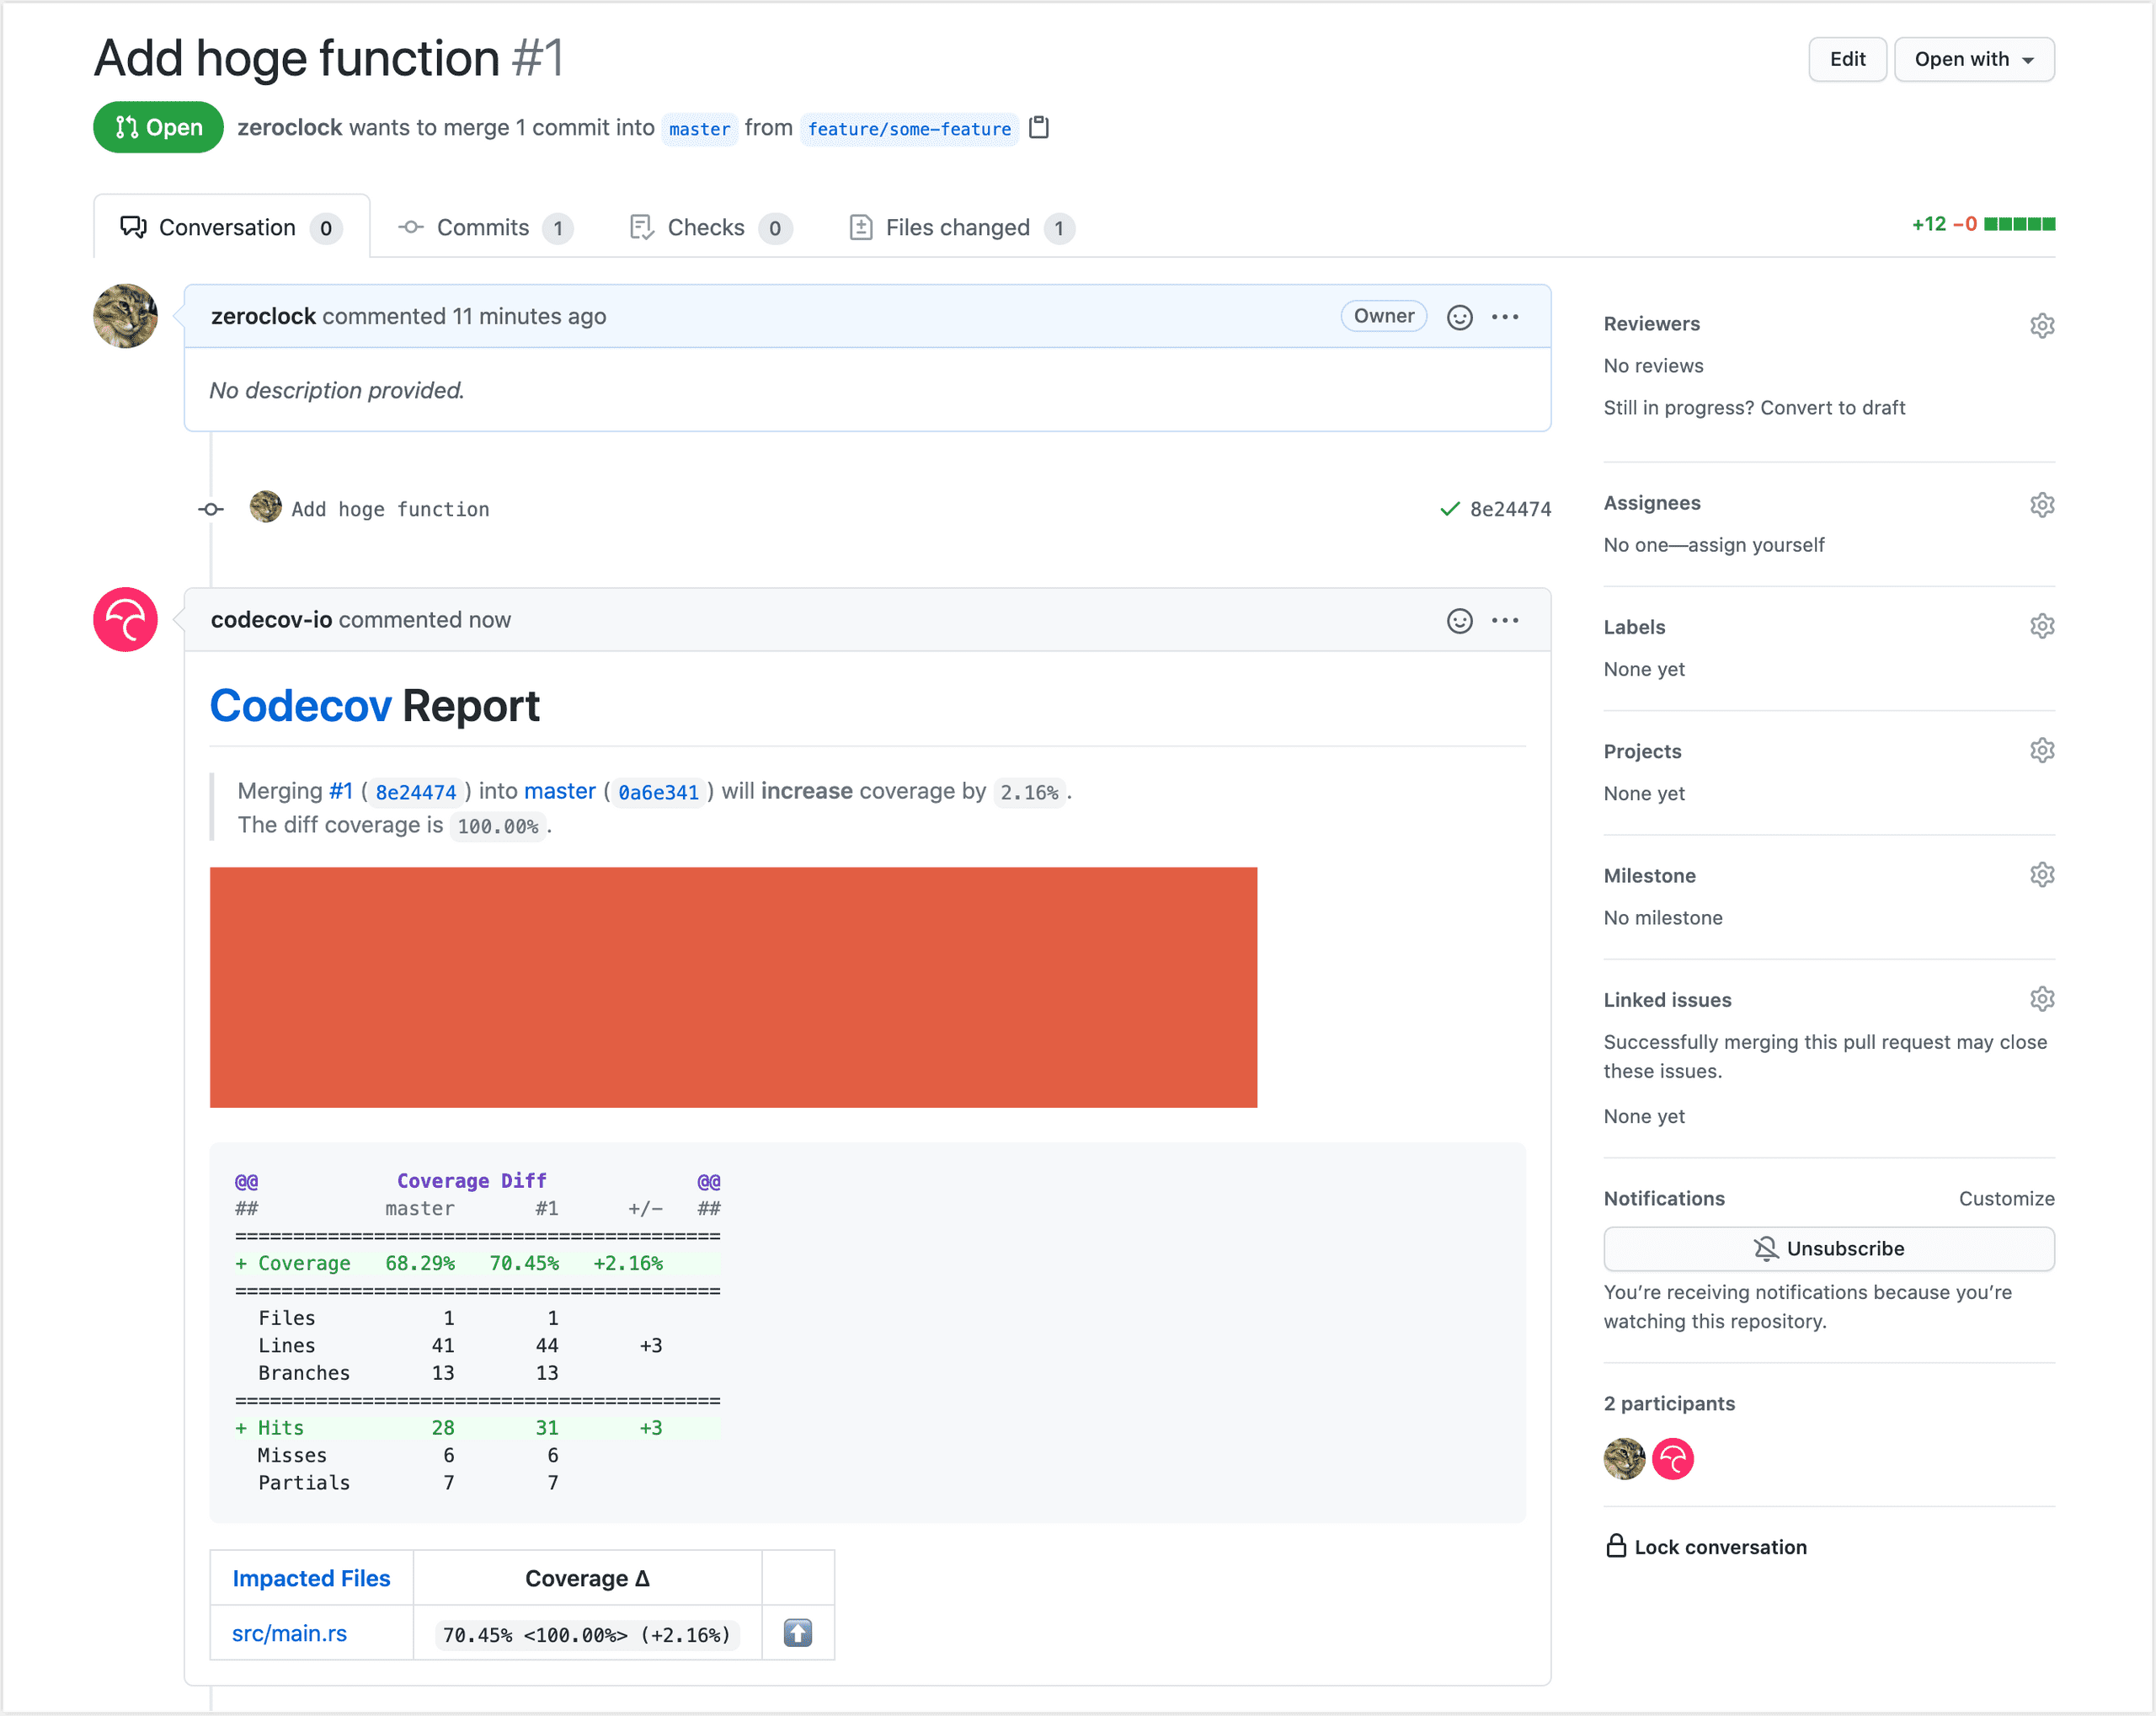
require_head: yesこれで、PR時には自動的にカバレッジレポートをコメントしてくれるはずです。
動作確認+まとめ
では、実際にmasterブランチとreleaseブランチにそれぞれPushしてみます。

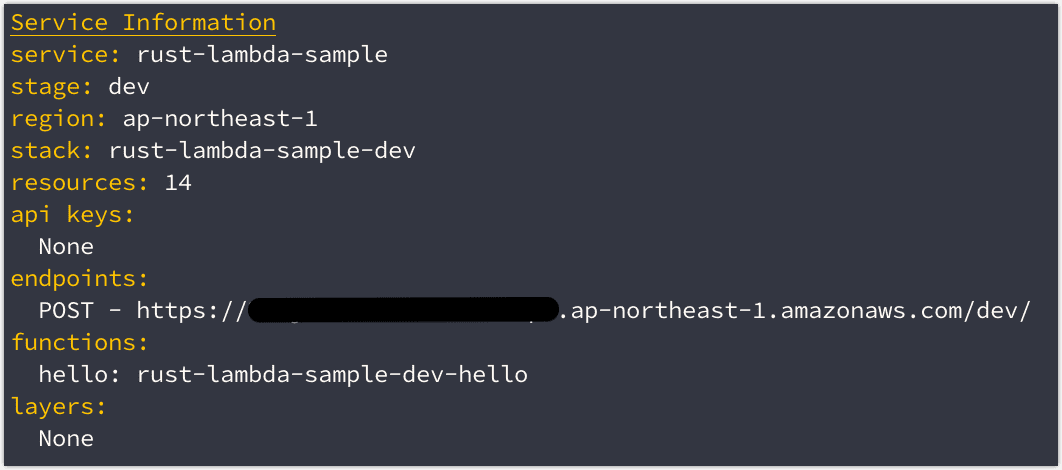
念の為それぞれの環境でAPIを叩いてみます。

問題無さそうですね。
では、プルリクしてみます。

きちんとカバレッジレポートがコメントされています。
なお、今回作ったサンプルは下記のリポジトリになります。
現状CI/CDサイクル回すのに10分程度かかっちゃってますが、Dockerイメージをキャッシュするとかでもっと早くなりそうな気がしています。
また、ローカルとデプロイ後で若干レスポンスの形式が異なる(ローカルだとbody階層が増えちゃってる)ので、そこも要調整な感じですが、まだマージされていないプルリクを使用しているので、もしかしたらマージされる頃には直っているかも(私の設定ミスの可能性もあり)。
なにはともあれ、これで色々な意味で足かせになっていたLambdaのCI/CD環境が構築できました。同じような悩みを抱えている人に参考になれば幸いです。